¶ Advanced Settings
This is the section that allows you customise your business account further to suit it with such things, Card , estimate and Invoice numbering standard, User accounts, your business logo, address and contact details.
Below is a quick summary of each of the sections and what they can help you
- Cards: Set your Card numbering by addinng an aphabetical or numerical prefix, set a starting number count. Usefull when wanting your new jobs to start counting from the last number of another system your using.
- Esimate: Set your Estimate numbering by addinng an aphabetical or numerical prefix, set a starting number count. Usefull when wanting your new Estimates to start counting from the last number of another system your using. Set your default rates for new private estimates so they auto apply as they are different to Insurance rates.
- Invoices: Set your Invoice numbering by adding an aphabetical or numerical prefix, set a starting number count. Usefull when wanting your new Invoices to start counting from the last number of another system your using. Set your default payment terms and other invoice template standards
- Users: Add, Delete users in your account, update their contact details or assign them to specific roles. As an admin reset their passwords or disable them when they leave your business so can still get individual performance data and prevent remote access.
- Groups: Every User account can be assigned a Role. This role place them in a group which inturn lets you manage visibility of Cards in the system. For example if you want those in the Panel Technicans group to not see the same Jobs cards in the Paint Technicians group so they dont accidently mark each others tasks. It completelty self managed and changes are instant.
- Integrations: This lets you self manage integration settings between Repair-shop and supported systems.
- SMS: Self manage your SMS text using templates. Set your greeting SMS text to go out as a standard with every one.
- My Account: Your personal User accounts to self edit contact details or change your password.
- Business Profile: Set your Business details which are also used in the Estimate and Invoice PDF printed or sent out. for multi-site business you can add multiple locations to assign users to a specific locations. There will be more features coming out for multi-site business in future updates for productin management and reporting.
- Billing: Manage your monthly billing plan, enable or disable add ons at any time to manage your costs. See you data storage consumption to manage addtional data packs. For those on Free or Paid plans you can view your invoices online or print them as PDF.
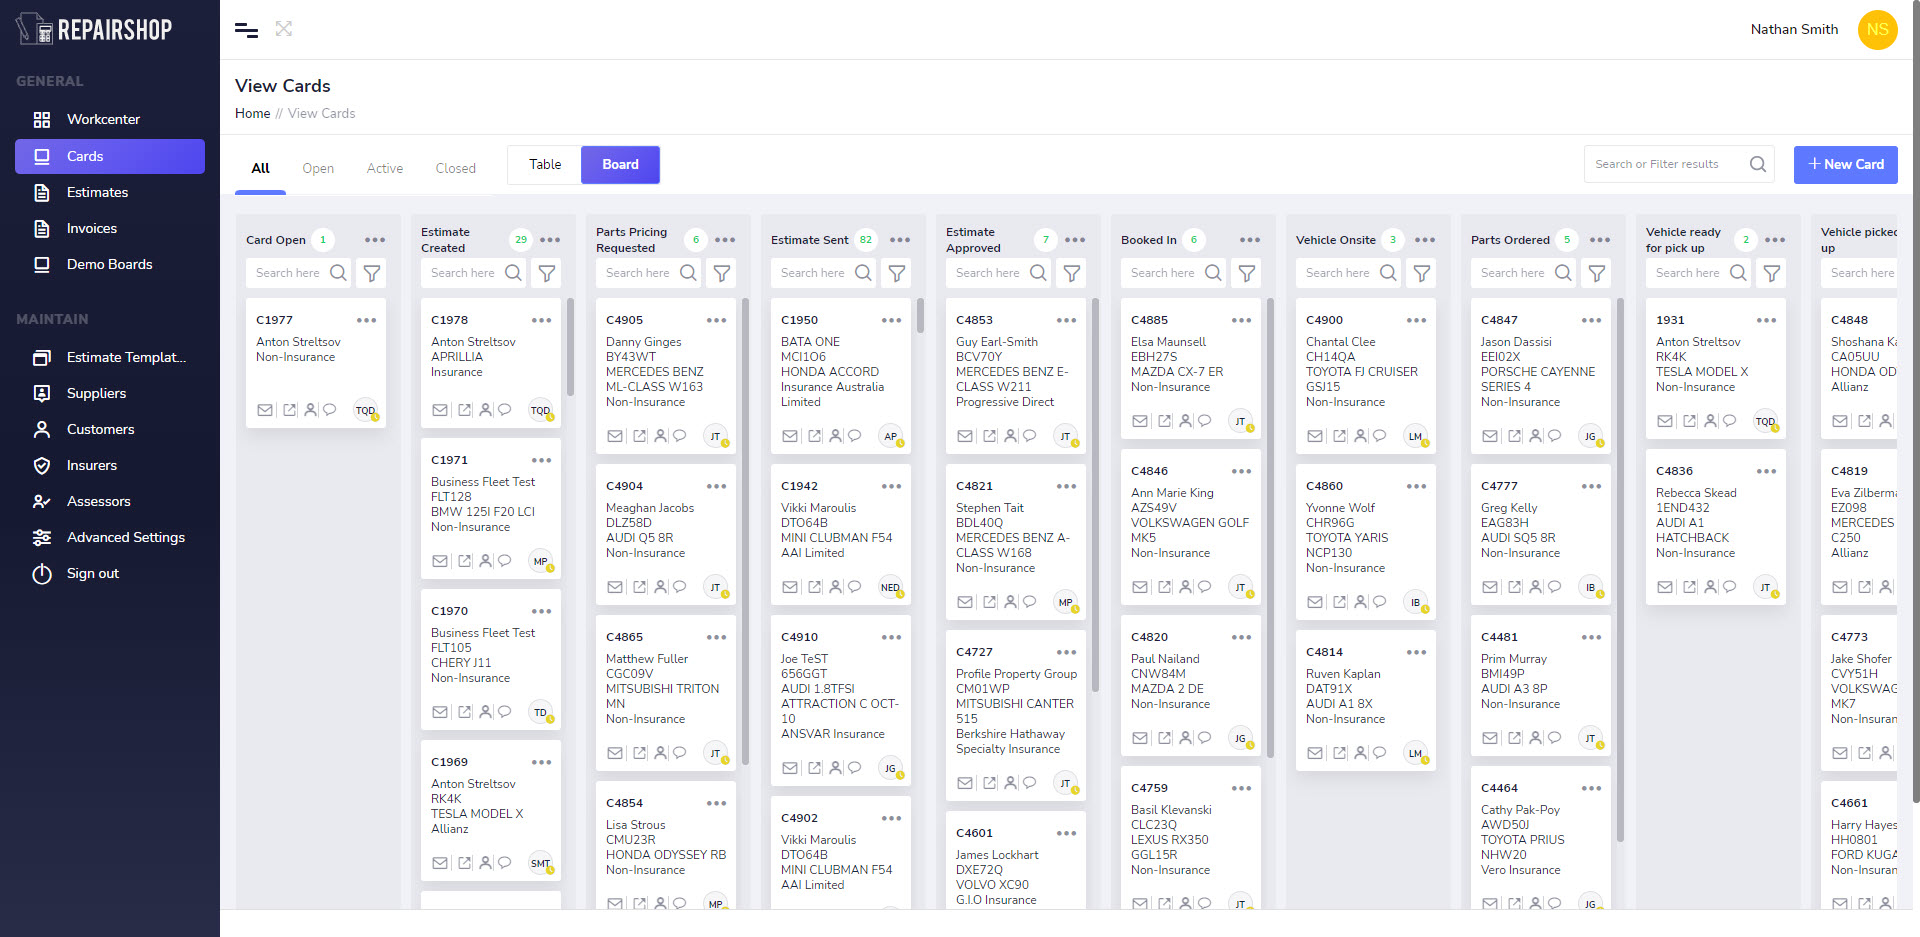
¶ Cards
In this section you are able to set customised numbering standards that suit your business or can be used to align to and continue the numbering count from another system that you are using.
¶ Card - Standard
Manage settings that wil be used to define your Card Numbering standards for all new Cards created
¶ Card Prefix
This field allows you to have an alphanumerical prefix in front of every new card number created by the system. This can be useful to differentiate a Card reference number from an Estimate or Invoice number referenced being used by people in the office or the workshop depending on what they comunicating about. It also lets you mirror the numbering from another system your using in order to let you transition easily and not have to train everyone on a new number reference.
Eg if you put a “C” in the Card Prefix field as reference the sequenced numbers would look like this.
- C0001
- C0002
Eg if you leave this field blank in the Card Prefix field then no text is attached and the number sequence will look like this.
- 0001
- 0002
¶ Card Number Start
This field allows to set the starting number count to begin from for any number other than “0”. This can be usefull if you are transitioning from another system whereby the number count is already high and you want to continue on from where you left off.
Eg if your current system has a number count of “1000” and you had a “C” in the Card Prefix, just set in the Card Number Start field ”1001" and the next numbers in the sequence would look like this.
- C1001
- C1002
Eg if your current system has a number count of “1000” and you left the Card Prefix field blank, just set in the Card Number Start field ”1001" and the next numbers in the sequence would look like this.
- 1001
- 1002
¶ Card Number Length
This field allows you to set a limit in total length of the numbers for the system to use other than the default of “3”. This can be usefull if you are transitioning from another system whereby the number length is already defined and you want to continue or increase on from where you left off.
Eg if your current system has a number count of “1000” and with a “C” in the Card Prefix you would set the Card Number Start field ”1001", then set the Card Number length to “4”. The next numbers in the sequence would look like this.
- C1001
- C1002
Eg if your current system has a number count of “1000” and with a “C” in the Card Prefix you would set the Card Number Start field ”1001", then set the Card Number length to “5”. The next numbers in the sequence would look like this.
- C01001
- C01002
Eg if your current system has a number count of “1000” witha blank Card Prefix you would set the Card Number Start field ”1001, then set the Card Number length to “5”. The next numbers in the sequence would look like this.
- 01001
- 01002
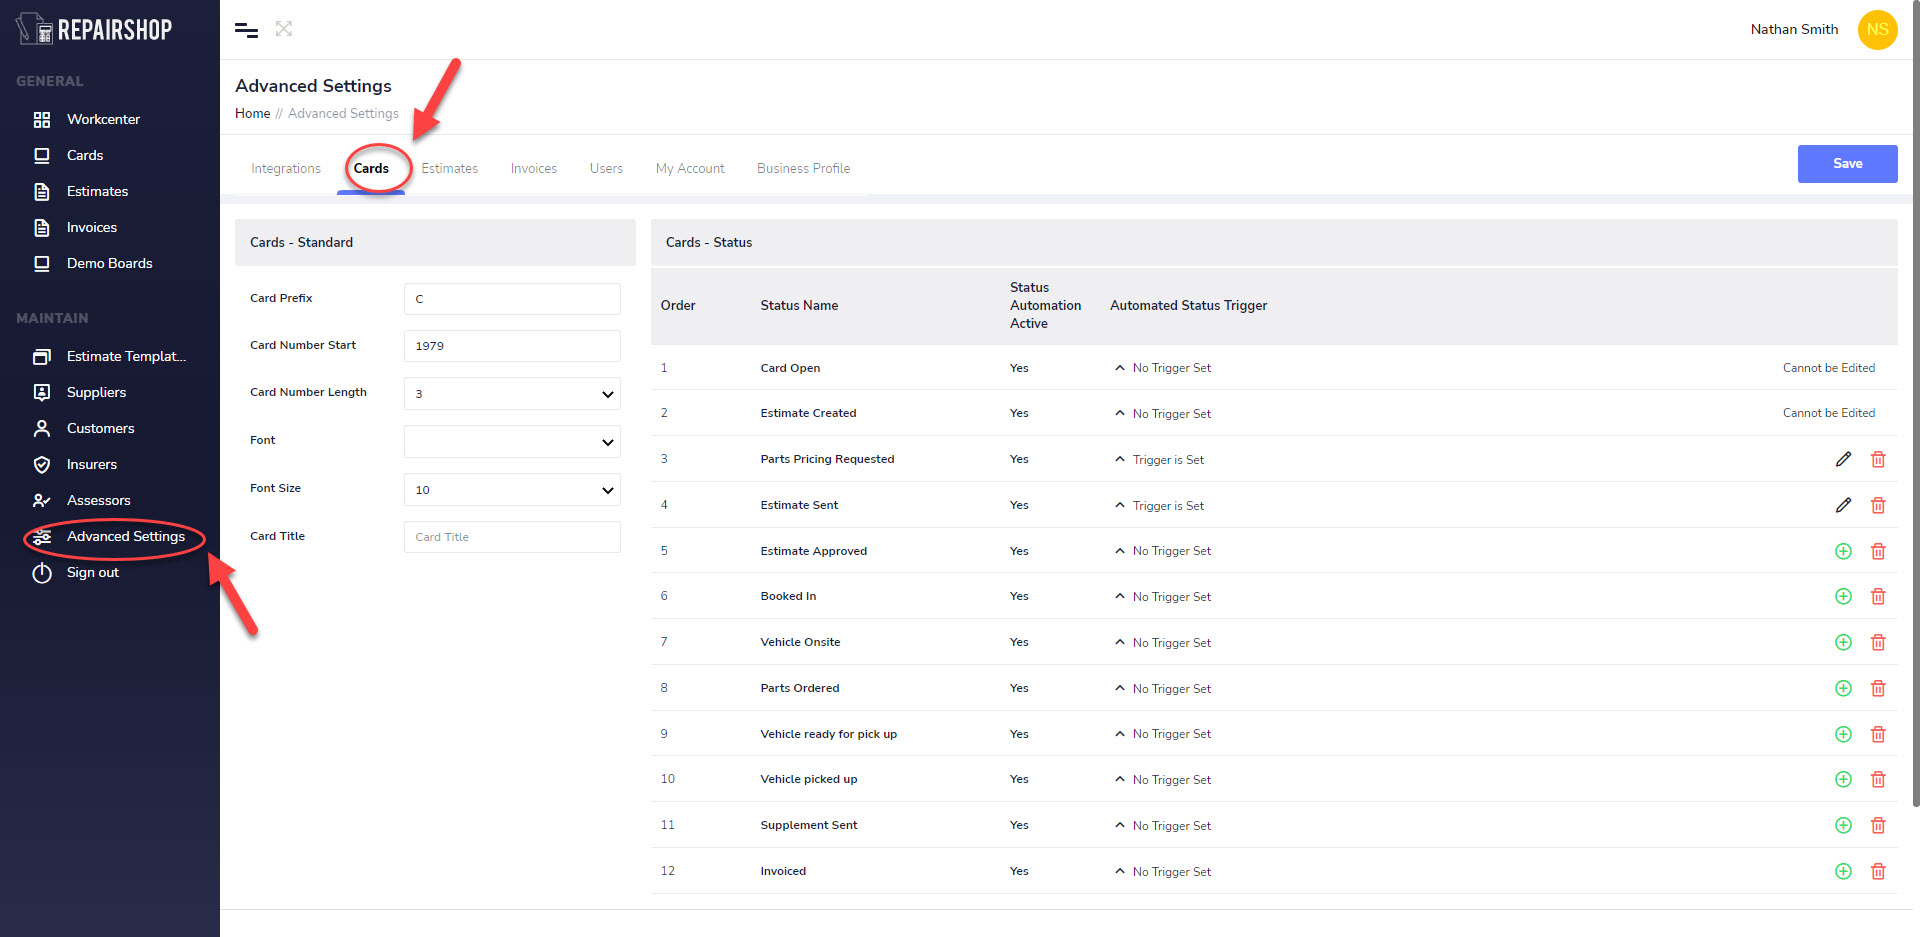
¶ Card Status
This section allows you to customise the status to the way your business operates, including setting up triggers that automate movement of Cards from one status to another after a condition is met.
- Order: This is the numerical order in which status appear in the Boards section or any drop down status fields or sliders.
- Status Name: The name that will appear in in the Boards section or any drop down status fields or sliders.
- Status Automation Active: Lets you know if the status is Active or not. Upcoming updates will allow you to self manage the active status. By default the status is always Active=Yes.
- Automated Status Trigger: Lets you define conditions that need to be met for a card to be autmatically placed in this status. Contact support@repair-shop.com.au for more help understanding this or to have them set it up for you the way want automation of card workflows to work for your business.
¶ Managing Card Status
Repair-shop lets rename the current status names, remove, reposition and create new ones to allow status to fit in with how your business operates. Its a better way to manage each Vehicle like a mini project with a start and end. You make your business series of steps/status and small or as large as you want.
To manage a new card status, go into the ‘’Advanced Settings’’. From here click onto cards.
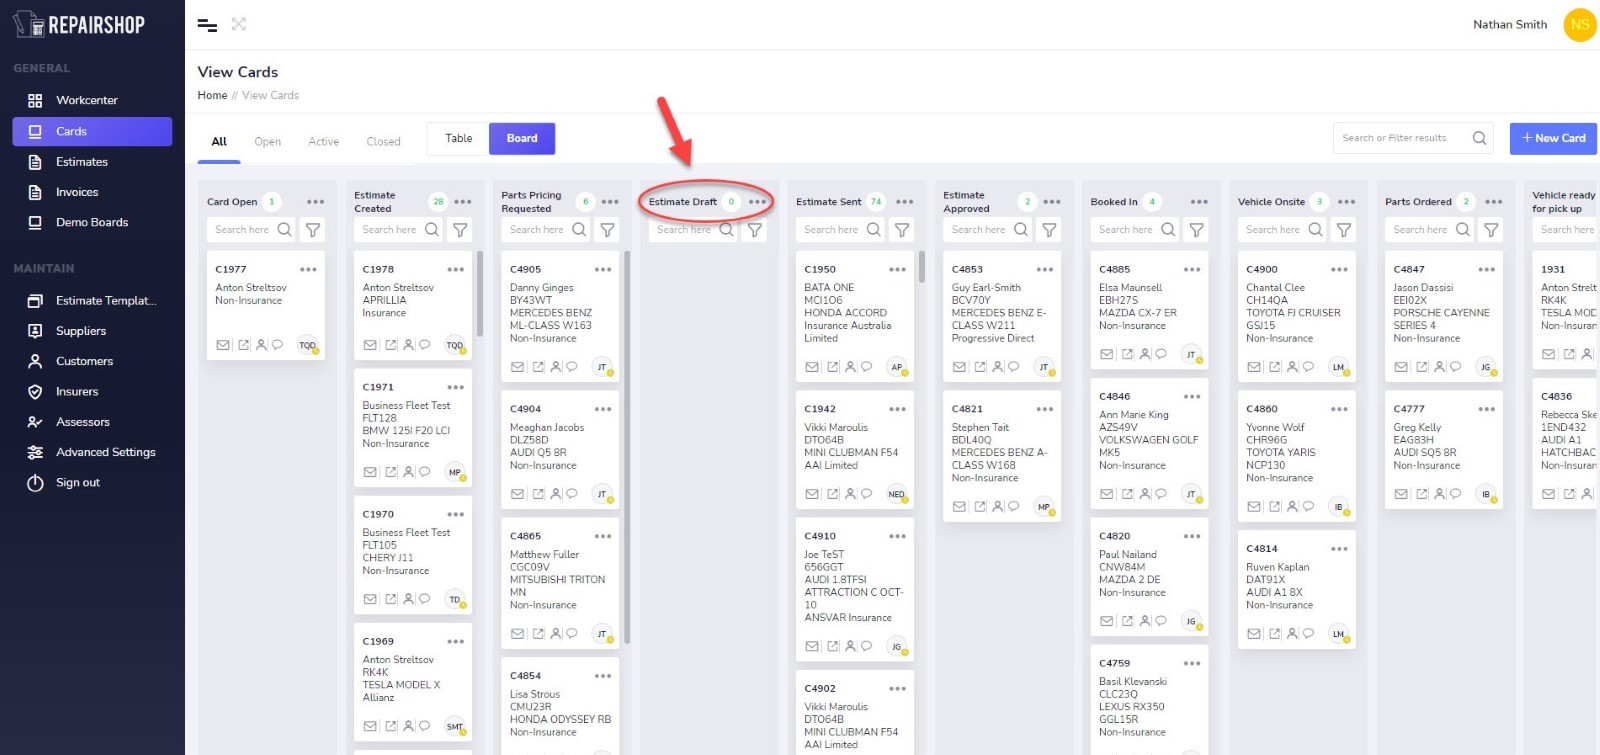
¶ Adding a New Card Status
Go to the bottom of the page and in the Add a new status name’ field., fill in the name of the status as you want to create.
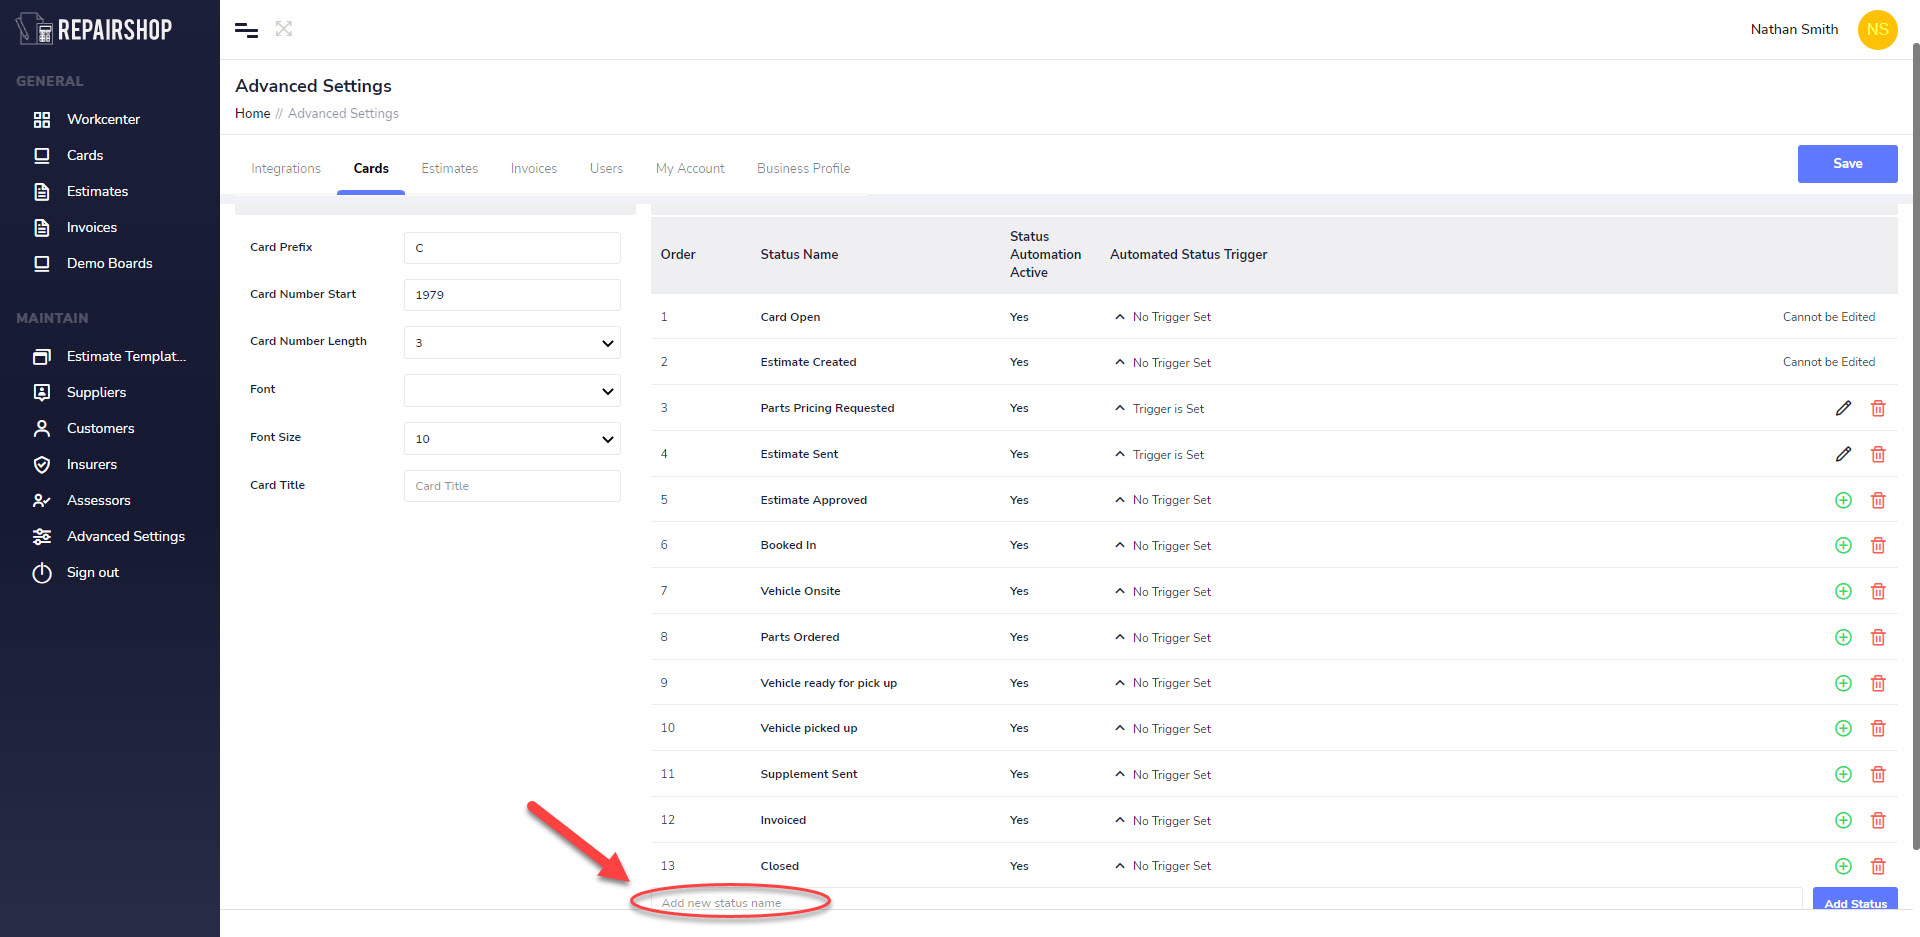
After naming the new card click the Add Status button.
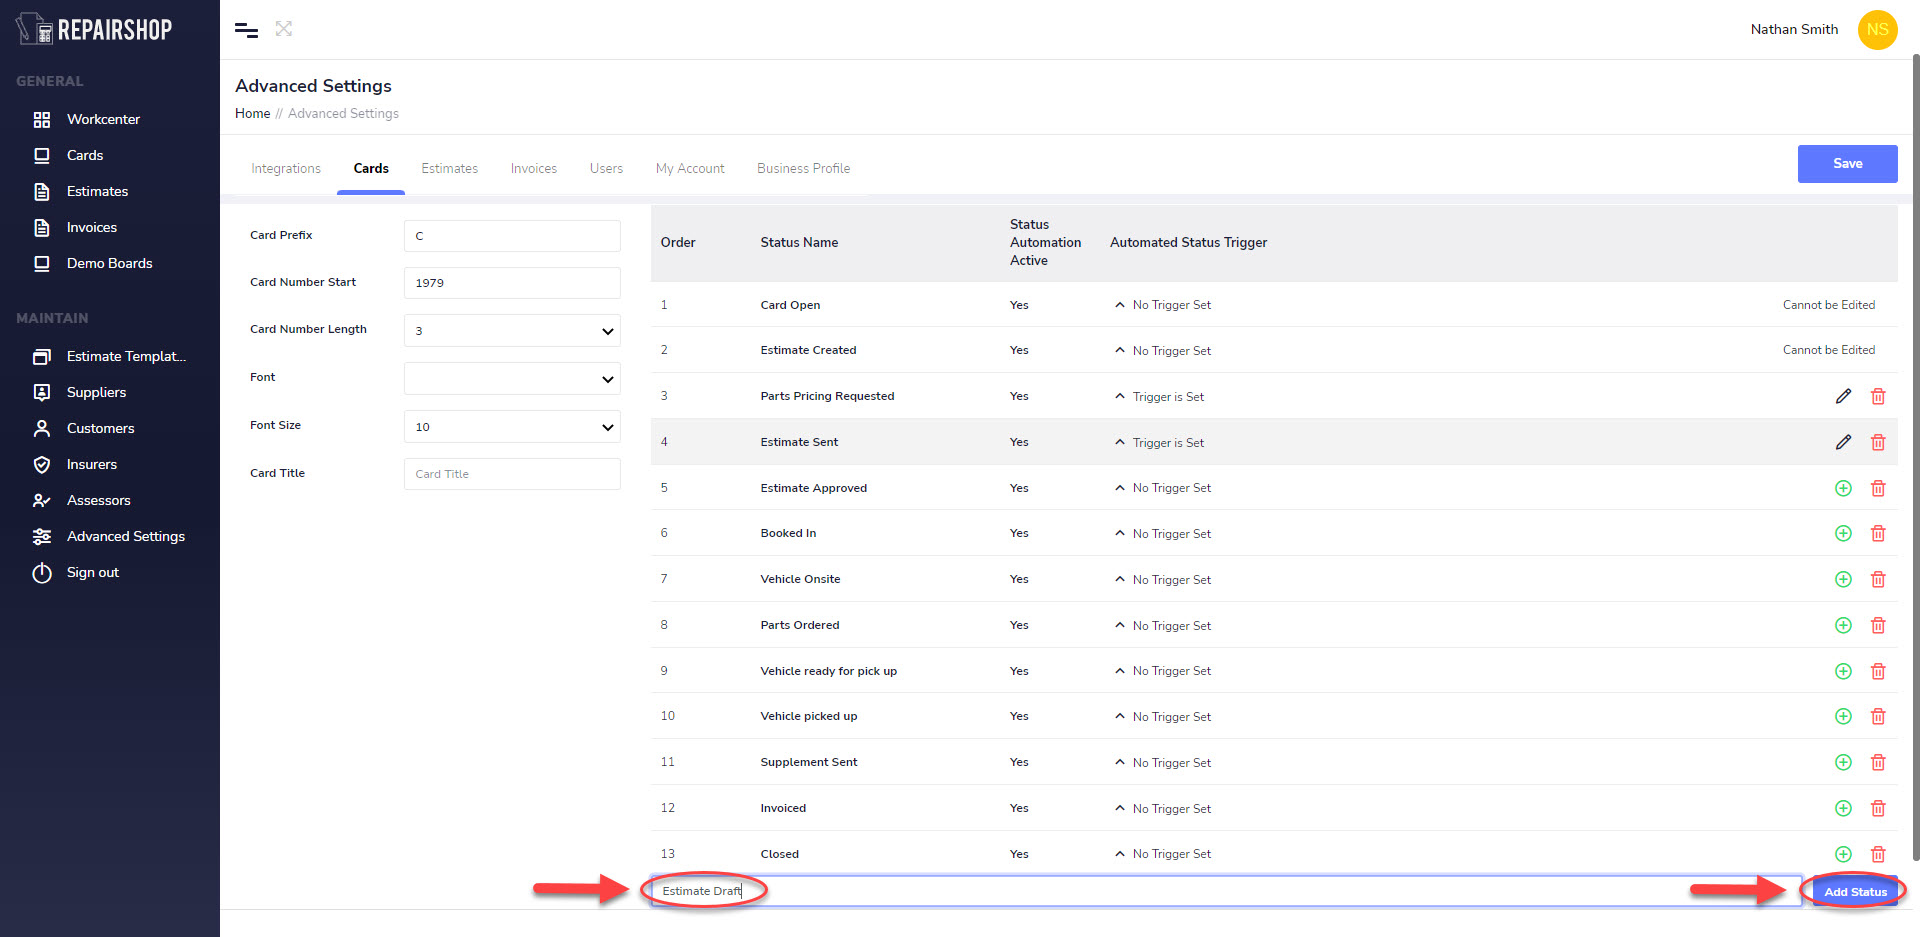
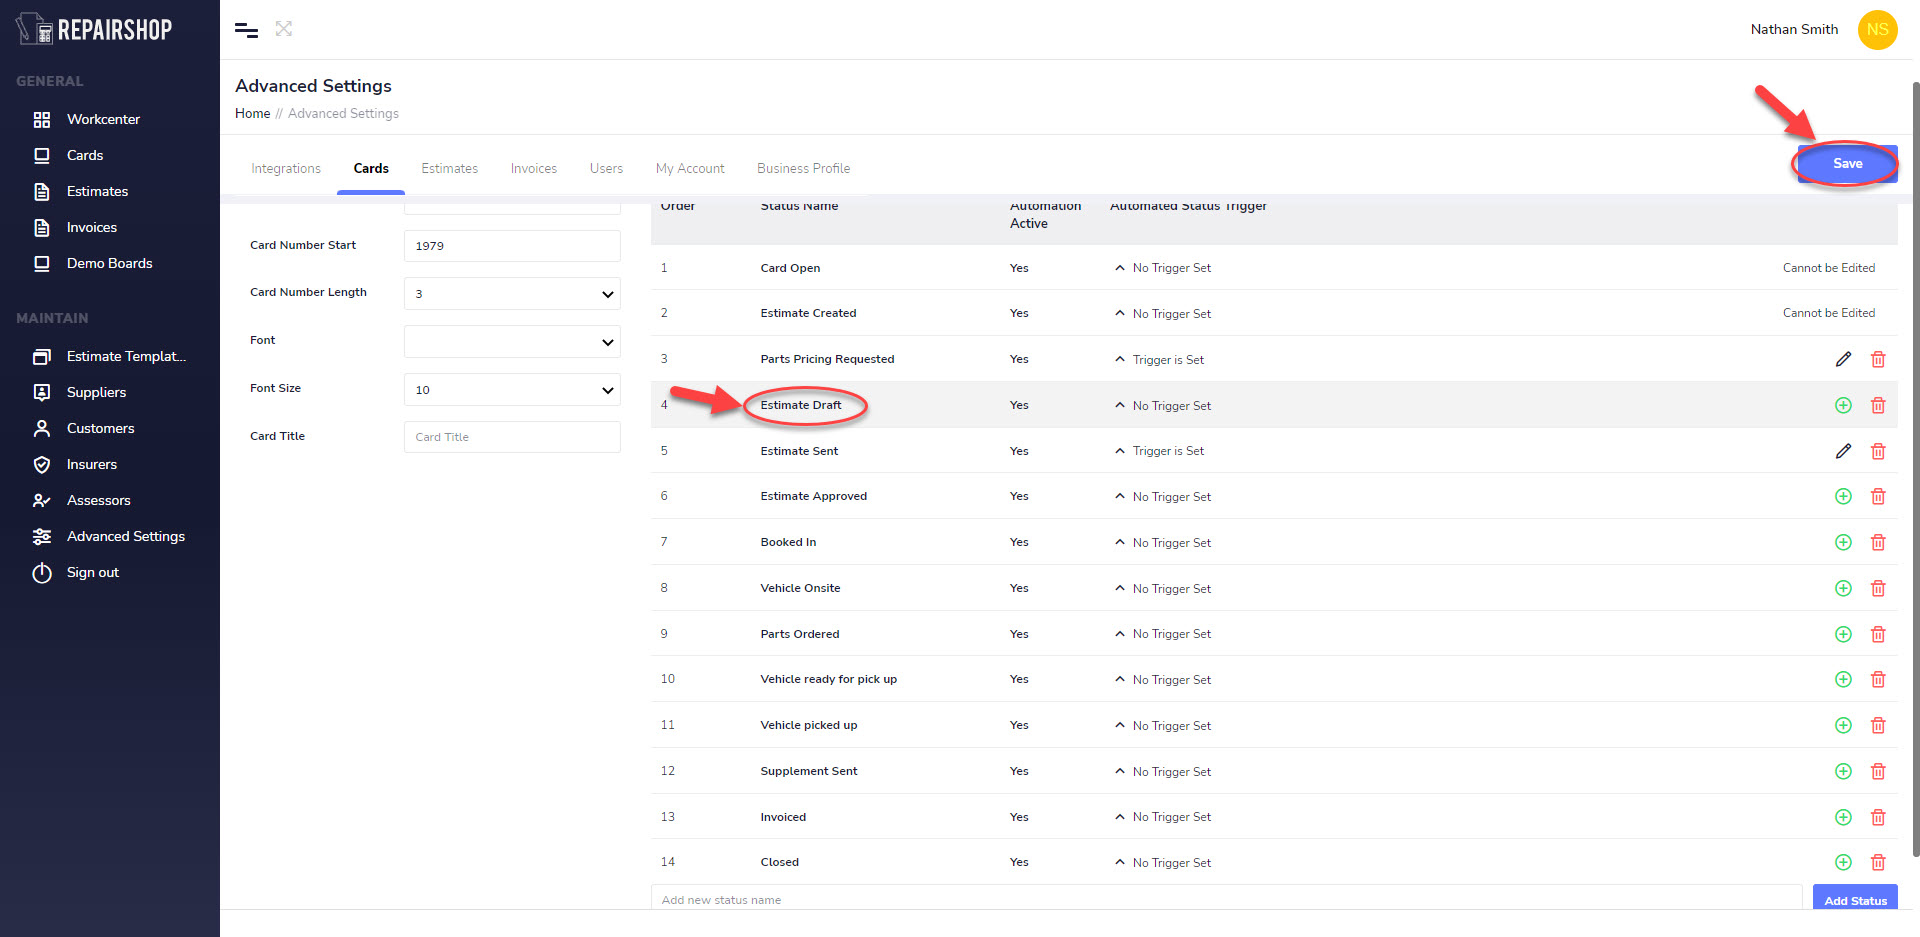
From here you can move the status in any order by clicking on the status you created, then dragging and dropping it into position. Then press Save to make sure the position and the new name is saved.
To view the new status, go back into cards Board view and refresh your page.
After refreshing you’ll see the new status added.
¶ Deleting an existing Status
To delete a status, go to the status name you want to delete and the press on the Delete icon to remove it.
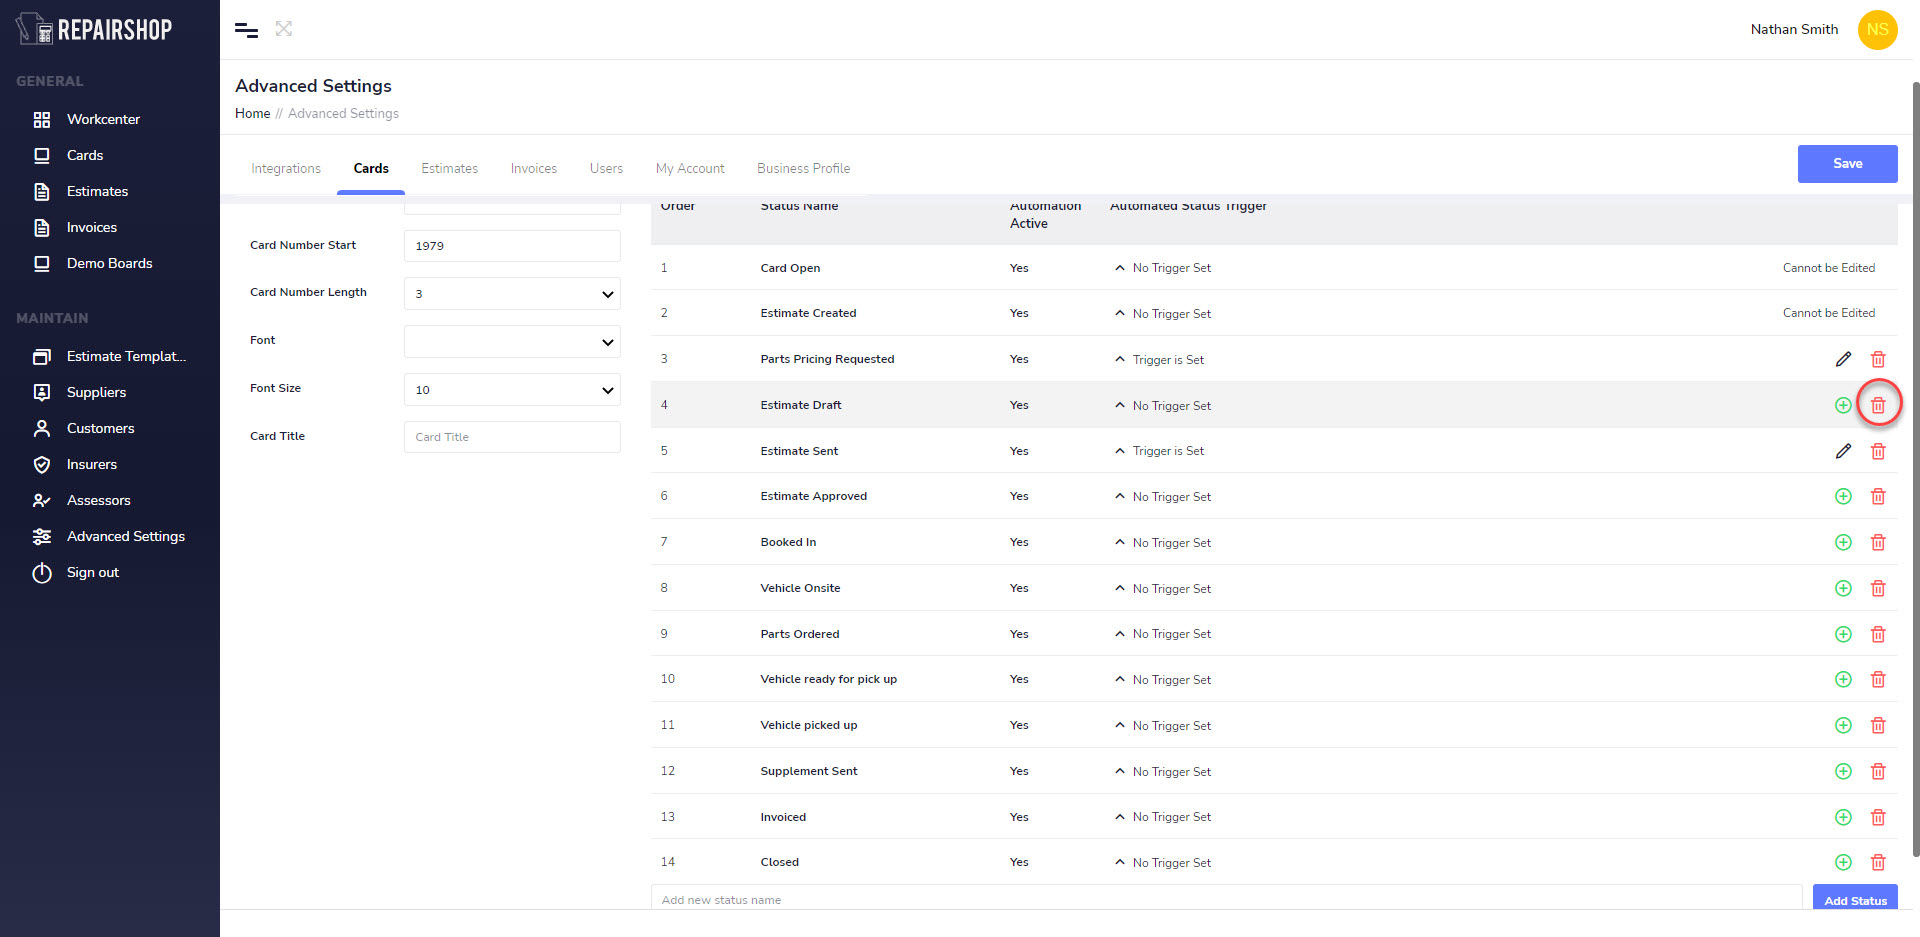
¶ Rename an Existing Status
To rename a status, go to the status name you want to rename and the press on the + icon to place it in the edit mode. There you will see the Status Name field is now ready to be edited.
Remember to click on the Save button after making changes.
¶ Estimates
In this section you are able to set customised numbering standards that suit your business or can be used to align to and continue the numbering count from another system that you are using.
¶ Estimate - Standard
Manage settings that wil be used to define your Card Numbering standards for all new Cards created
¶ Estimate Prefix
This field allows you to have an alphanumerical prefix in front of every new Estimate number created by the system. This can be useful to differentiate a Estimate reference number from an Card or Invoice number referenced being used by people in the office or the workshop depending on what they comunicating about. It also lets you mirror the numbering from another system your using in order to let you transition easily and not have to train everyone on a new number reference.
Eg if you put a “E” in the Card Prefix field as reference the sequenced numbers would look like this.
- E0001
- E0002
Eg if you leave this field blank in the Estimate Prefix field then no text is attached and the number sequence will look like this.
- 0001
- 0002
The Estimate Number Start and Estimate Number Length that are applied are based on those settings that your set in the Card numbering section. The Esimate number matches that of the card because when you create a new card an estimate will be created at begining or later to match.
¶ Terms Estimate
Place your estimates terms here for them to appear by default on all estimates PDF created or sent out via repairshop email or to Claims management systems.
Example:
This quote is valid for 30 days
¶ Rates
For private estimates only you can set the default Rate in $$ on your RR, Repair, Paint, Mechanical, as well as a Default Paint material.
- $ values to be set excluding GST
- Rates applied automaticially when no Insurer is set in the Esitmate detail page at the time of wirting it up.
- To set default rates on a per insurer basis check out the Insurers section of this guide.
Estimate Methodology explained:
| Estimate Methodology | Description |
| Custom | Times that originated from the Motor Traders Association |
| NTAR | IAG defined repair times based on individual vehicle schedules |
| LTAR | IAG defined repair times based on individual vehicle schedules |
| Zurich | Coming Soon. (Zurich Insurance Times) |
¶ Auto Save
To help you perform repetitive tasks quicker. Repair-shop lets you toggle between Auto Saving or Manually saving every change in Estimates.
Its up to every business to set their preference here. Its recommended that when starting out for the first time set this to disabled and when your a pro at the system and want to have it work faster, set Auto Save to Active.
¶ Invoices
¶ Invoice - Standard
Manage settings that wil be used to define your Invoice Numbering standards for all new Invoices created.If these are left blank then it applies the same numbering standard as set up in Cards. Its recommended to add an Invoice Prefix to differentiate this from a Card or Estimate.
Because repairshop alows you to create an invoice that does not have to be related repair of a vehicle the numbering standard set here is used for that.
¶ Invoice Prefix
This field allows you to have an alphanumerical prefix in front of every new Invoice number created by the system. This can be useful to differentiate a Invoice reference number from an Card or Estimate number referenced being used by people in the office depending on what they comunicating about. It also lets you mirror the numbering from another system your using in order to let you transition easily and not have to train everyone on a new number reference.
Eg if you put a “INV” in the Card Prefix field as reference the sequenced numbers would look like this.
- INV0001
- INV0002
Eg if you leave this field blank in the Estimate Prefix field then no text is attached and the number sequence will look like this.
- 0001
- 0002
¶ Invoice Number Start
This field allows to set the starting number count to begin from for any number other than “0”. This can be usefull if you are transitioning from another system whereby the number count is already high and you want to continue on from where you left off.
Eg if your current system has a number count of “1000” and you had a “INV” in the Card Prefix, just set in the Invoice Number Start field ”1001" and the next numbers in the sequence would look like this.
- INV1001
- INV1002
Eg if your current system has a number count of “1000” and you left the Card Prefix field blank, just set in the Card Number Start field ”1001" and the next numbers in the sequence would look like this.
- 1001
- 1002
¶ Invoice Number Length
This field allows you to set a limit in total length of the numbers for the system to use other than the default of “3”. This can be usefull if you are transitioning from another system whereby the number length is already defined and you want to continue or increase on from where you left off.
Eg if your current system has a number count of “1000” and with a “INV” in the Invoice Prefix you would set the Invoice Number Start field ”1001", then set the Invoice Number length to “4”. The next numbers in the sequence would look like this.
- INV1001
- INV1002
Eg if your current system has a number count of “1000” and with a "INV” in the Invoice Prefix you would set the Invoice Number Start field ”1001", then set the Invoice Number length to “5”. The next numbers in the sequence would look like this.
- INV01001
- INV01002
Eg if your current system has a number count of “1000” with a blank Invoice Prefix you would set the Invoice Number Start field ”1001, then set the Invoice Number length to “5”. The next numbers in the sequence would look like this.
- INV01001
- INV01002
¶ Due Date
Set a default due date of payment that appears on every PDF invoice. This setting is also applied to invoices connected to accounting systems.
- Today
- 7 Days
- 30 Days
- 1st Day of Next month
- Last day or next month
¶ Terms & Payment Advice
Type in the the text that you want to appear at the bottom of every invoice PDF that is displayed to your customers.
Exmaple
Thanks you for choosing us. We value your business.
¶ Auto Save
To help you perform repetitive tasks quicker. Repair-shop lets you toggle between Auto Saving or Manually saving every change in Invoices.
Its up to every business to set their preference here. Its recommended that when starting out for the first time set this to disabled and when your a pro at the system and want to have it work faster, set Auto Save to Active.
¶ Users
This section is the main area to manage all user accounts linked to your business account. it lets you self manage sich things as password resets for your team members, Set their account status to Active or not active, add profile photos and emaill and phone details.
¶ Creating a New User
Click on the +New User button, this sets the fields to the right blank ready for input.
Below is a description of what each of the fields are for in the creation of user accounts.
- Username: Must be unique username that no other account holder in the system uses. Popular usernames may alreayd be taken by other business account users, Its recomended to use a combination of a letters and numbers. Special chracters are accepted but not recomended.
- First Name: Used to display in fields in the system as part of the profile name when your team is looking to assign to one another and in Esimates, and electronic submissons to claims systems that require this.
- Last Name: Used to display in fields in the system as part of the profile name when your team is looking to assign to one another and in Esimates, and electronic submissons to claims systems that require this.
- Email Address: Used for the purpose of email users wanting to self manage password resets. Saves on time having others reset passwords.
- Business Location: For multi-site business, lets you set a user as a member of a particular location.
- Partssearch Shop Location: For multi-site business, lets you set a user default as a member of a location from the list of locations in Partssearch. This is used to auto fill delivery locations in quotes & orders processed for estimaton teams spread out in different locations. You will need a registered account in partssearch for this field to appear.
- Work Phone: Lets you record a work number
- Mobile Phone: Lets you record a mobile number. Used in future features that included SMS notifications and Password Security and Multifactor authentication of Shop Admin accounts.
- Role: Select the role to associate a user account to. The role you select applies a policy to the account and limits sections in the system made visible to a user and the rights that they have to make changes. See a summary below of what the different policies applied to differnet user roles.
View below a summary of rights that is applied to different User roles.
| Role Name | Summary of Rights |
| Shop Manager |
|
| Production Manager |
|
| Estimator |
|
| Customer Service |
|
| PDR Technician |
|
| Panel Technician |
|
| Stripper & Fitter |
|
| Detailer |
|
| Display Board |
|
We have some updates coming that will improve the way the user accounts are managed. For an help contact support@repair-shop.com.au.
¶ Groups
A full description of how to use this will be coming soon.
We have some updates coming that will improve the way the user accounts are managed. For an help contact support@repair-shop.com.au.
View below a summary of the group controls that can be applied to different roles.
| Group Name | Summary of Controls |
| Shop Manager |
|
| Production Manager |
|
| Estimator |
|
| Customer Service |
|
| PDR Technician |
|
| Panel Technician |
|
| Stripper & Fitter |
|
| Detailer |
|
| Display Board |
|
¶ Integrations
A description of how to use this will be coming soon.
We have some updates coming that will improve the way the user accounts are managed. For an help contact support@repair-shop.com.au.
View below a summary of the group controls that can be applied to different roles.
| System Name | Description |
| Partssearch |
Parts Pricing and Order Management system
|
| Estimage |
Claims Management System
|
| Xero |
Accounting System
|
Coming Soon !!
| System Name | Description |
| Claimlinq |
Claims / Assessing Management System
|
| Estimage Web |
Claims Management System
|
| ARNIE |
Claims Management System
|
| ORM |
Claims Management System
|
| DropBox - Business |
Data Storage File Management System
|
| Whatsapp - Business |
Digitial Chat System
|
| Microsoft Teams |
Digitial Chat System
|
| MYOB |
Accounting System
|
| SAGE |
Accounting System
|
¶ SMS
A description of how to use this will be coming soon.
We have some updates coming that will improve the way the user accounts are managed. For an help contact support@repair-shop.com.au.
¶ My Account
A description of how to use this will be coming soon.
We have some updates coming that will improve the way the user accounts are managed. For an help contact support@repair-shop.com.au.
¶ Business Profile
This section lets you manage key business information that is applied to your Estimate, Invoice and Receipt templates
¶ Details
This section lets you configure your business accounts details that are used for your Estimates and Invoice PDFs.
The Business Details tab contains fields to set the following.
- Display Name: Used to display internally in the application in the Header section.
- Entity Name: Registered Entity Name
- Legal Trading Name: Trading name. Used in Estimate, Invoice & Receipt template
- Business Type: Repairer Type
- Repairer License Number: Your RLN. Used in Estimate, Invoice & Receipt template
- Australian Business Number: ABN number. Used in Estimate, Invoice & Receipt template
- Branch (if Applicable): Branch if this applies to your business
- Organisation Desription: add a short description about your business
The Contact Details \ Postal Address
- Postal Address: Uses google search to find your address, if found you can use it to auto populate the rest of the fields
- Level/Unit/Lot Nbr: Manually enter your Level, Unit or Lot number is not found using search
- Street Nbr/Name: Street number and street name
- Suburb: Suburb
- State: select from a drop down of states for your country
- Postcode: postcode number
- Country: Country your business operates in.
The Contact Details \ Business Address
- Business Address: You can click on the Same as Postal Address checkbox to apply the business address or Use the google search input to find your address, if found you can use it to auto populate the rest of the fields
- Level/Unit/Lot Nbr: Manually enter your Level, Unit or Lot number is not found using search
- Street Nbr/Name: Street number and street name
- Suburb: Suburb
- State: select from a drop down of states for your country
- Postcode: postcode number
- Country: Country your business operates in.
- Business Email: Email to use in Esimate, Invoices and Receipts
- Phone: Phone number to use in Esimate, Invoices and Receipts
- Website: Your business website.
¶ Contacts
Displays all users in your account and allows you to manage their visibiliy and use of names in comunications sent out
¶ Locations
For Multi -site business you can add locations that can be used to set your team as memebers of a location for workshop production management features coming soon in this area.
¶ Billing
View below a summary of the group controls that can be applied to different roles.
| Settings | Description |
| Status |
|
| Plan Type |
|
| Cost (Per / Month) |
|
| Data Storage Limit |
|
| Data Storage Consumed |
|
View below a summary of the Add- On controls
| Add-On | Description |
| REGO/ VIN LOOKUP |
|
| REGO/VIN LOOKUP W/Build & Compliance |
|
| SMS Messaging - Outgoing |
|
| SMS Messaging - Incoming |
|
| Data Storage Add-on |
|
| Data Storage Add-on - As Needed |
|
| Close your Repair-shop account. |
|